3D UI Interactions
This page will teach you how to use the two types of Ultraleap user interface elements (UI) in your scene. Each user interface type is designed to make it easy for you as a developer to create the right UI for your project while maintaining intuitive ways for players to use their hands.
Note
Sample scenes can be found in:
Assets/Samples/Ultraleap Tracking/VERSION/XR Examples/2. Interactions/2. Physical UI.unity
Assets/Samples/Ultraleap Tracking/VERSION/XR Examples/2. Interactions/3. Hand Menu.unity
Quick Start with UI elements.
Note
For this example, we assume that you have an understanding of setting up a scene for hand tracking. If you do not, please check out the Your First Project Guide.
We offer several different types of UI which are built into the plugin. The quickest and easiest way to get started is to add the user interface elements to your scene via the Ultraleap toolbar. The tutorial below will allow you to add UI elements to your scene.
The two we will talk about on this page are:
3D UI Panel

The 3D UI panel is a template for static user interfaces (i.e. anchored in the world).
Hand Attached UI

The hand attached UI panels are great for any user interface that you want to keep with the player at all times.
From the Ultraleap toolbar, add the
Physical Hands Manager.
Note
You can also access the prefabs using the right click context menu in the Hierarchy panel.
Select the type of user interface that you would like to use by choosing the corresponding tab below.
Add the 3D UI Panel to your scene.
Note
You can find this options under: Ultraleap > Physical Interaction > 3D UI Panel
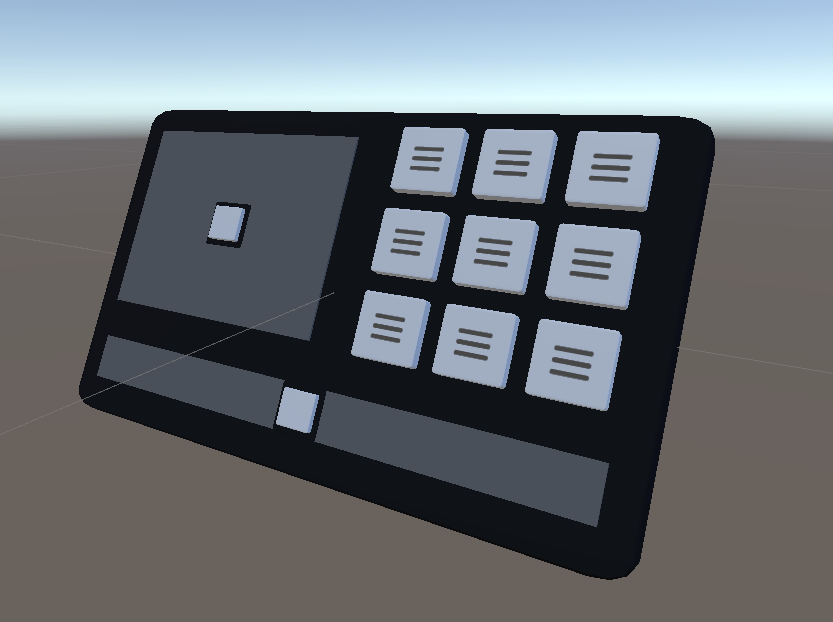
Once you have added the panel from the toolbar, open its children in the Hierarchy panel. Each section is shown here with the “Panel Cube” being the background element.
Note
You may delete sections you don’t need but will need to re-scale the “Panel Cube” to fit the new UI.
You can listen to UnityEvents that are attached to the Button and Slider components. This provides notifications when various states change on the interactable elements.
The Buttons
The buttons section has 9 buttons on it. These are standard Physical Hands buttons. More information on these can be found here: Physical Hands Button.
The key points of interest are the “Button Press” and “Button Unpress” events at the bottom of the Physical Hands Button script in the inspector Button objects.
The Sliders
To adjust the slider value the movable part of the slider, known as the thumb, needs to be pressed first. This part of the slider is actually a physical hands button. When pressed it can be moved along the ‘track’ to change the slider’s value. More information can be found here: Physical Hands Slider. Note: there is also a slder prefab that does not require the thumb to be pressed before it can be moved.
The key points of interest for getting started with the Physical Hands Sliders are “Slider Change Event”,”On Press” and “Slider button Unpressed” events.
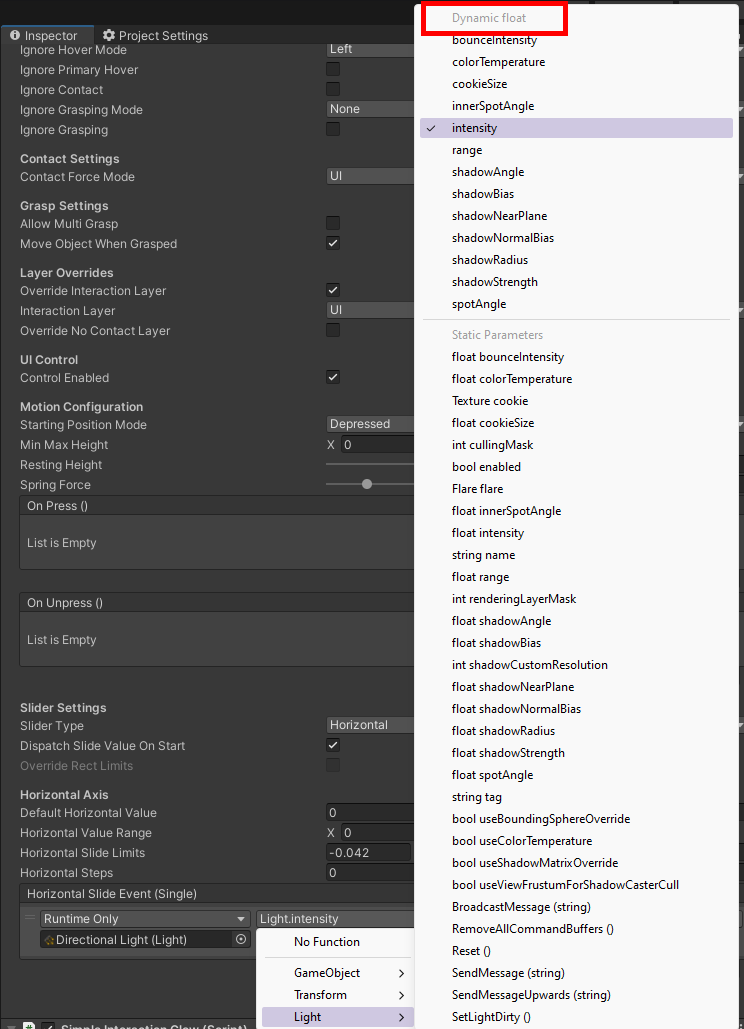
The slider events include a float value (as the payload) - the current value of the slider position - which can be passed into any function which takes in a float value.
Note: the slider always returns a value between zero and one, where the leftmost position of the thumb is zero and rightmost position is one. You will need to convert the value to your chosen range inside the consuming function if you need something else.
Make sure that you reference the dynamic event rather than the static one to get the value from the event.

Add an Attachment Hand Menu to your scene.
Note
You can find the UI options under: Ultraleap > Physical Interaction > Attachment Hand Menu
You can find more information on attachment hands via our Hand Attachments Documentation
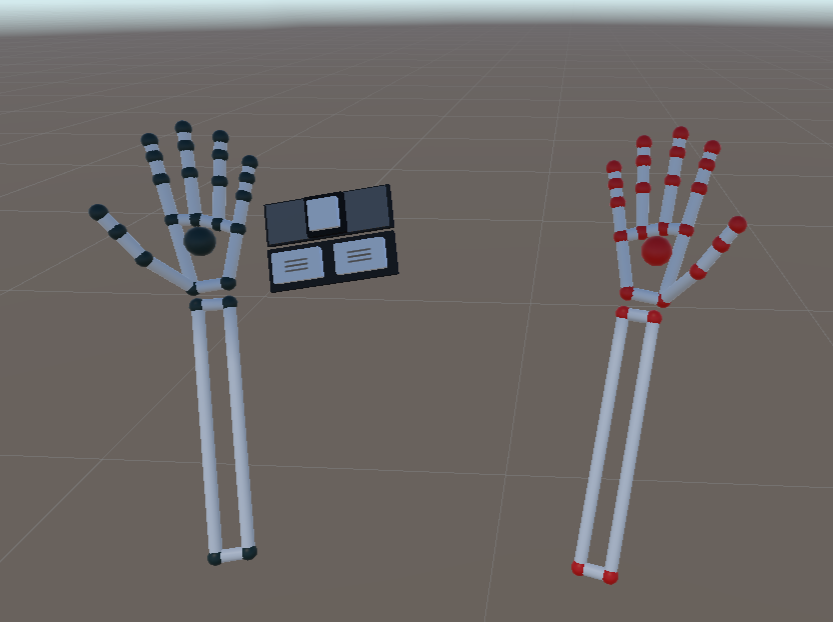
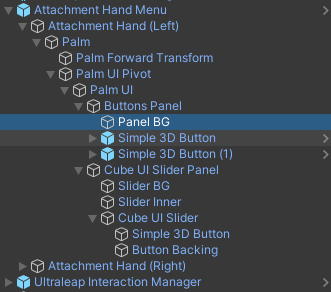
Once you have added the hand attached UI prefab from the toolbar you will see the attachment hand menu in the scene hierarchy. Expand its children fully. The points below explain the function of each part:
Attachment Hand Menu: This is the base of
Attachment Hands. Game objects representing the locations selected in the “Attachment Transforms” view in the Inspector will appear below the Attachment Hand parent game object. This Example assumes you have not changed the default settings - so there is only one attachment point - the position of the palm centre.Attachment Hand: this represents the parent object for each hand (you do not need to worry about it at this point).
Palm: this game object tracks the position of the palm and is the anchor point for the hand based user interface.
Palm UI Pivot: This object contains a script which enables and disables the user interface depending on whether your palm is facing the camera.
Buttons Panel & Cube UI Slider Panel: These are the user interface elements in the hand menu. Use the dropdowns below to learn more about them.
You may delete sections of the user interface you don’t need but will need to re-scale the “Background (BG elements)” to fit the size of the new UI.

You can listen to UnityEvents from the Button and Slider components. These events provide notifications when the state of the interactable elements change.
The Buttons
The buttons section contains 9 buttons. These are standard Physical Hands buttons. More information on these can be found here:
Physical Hands Button.
The key points of interest for getting started with the button are the “Button Press” and “Button Unpress” events. These events are shown at the bottom of the Physical Hands Button script.
The Sliders
To adjust the slider value the movable part, known as the thumb, needs to be pressed first. This part of the slider is actually a physical hands button. When pressed it can be moved along the ‘track’ to change the slider’s value. More information can be found here: Physical Hands Slider. Note: there is also a slder prefab that does not require the thumb to be pressed before it can be moved.
The key points of interest for getting started with the Physical Hands Sliders are “Slider Change Event”,”On Press” and “Slider button Unpressed” events.
The slider events include a float value (as the payload) - the current value of the slider position - which can be passed into any function which takes in a float value.
Note: the slider always returns a value between zero and one, where the leftmost position of the thumb is zero and rightmost position is one. You will need to convert the value to your chosen range inside the consuming function if you need something else.
Make sure that you reference the dynamic event rather than the static one to get the value from the event.
